Section 5 Data Entry: Architecture
5.1 Recording Above-ground Resources in VCRIS: Overview
All properties have at least one DHR ID number and can have multiple DHR ID numbers. Multiple DHR ID numbers do not indicate increased property significance. For example, if a property was originally recorded as an individual resource under a seven-digit number, and then is re-surveyed as part of a historic district survey the original seven-digit number is retained and a tertiary number is added as the Other DHR IDs. This associates the property with the historic district.
An example of a property with multiple DHR ID numbers is Monticello, which has an individual ID number and a historic district ID number, as seen here:

All data entry – both recording newly identified properties and updating previously recorded properties – begins with a project.
A project can include one property or many properties.
A project can include newly identified properties and previously recorded properties.
Any properties in historic districts will need to be in a separate project with only properties from the district in the project. Do not mix properties that are within and not within a district into one project.
5.2 Data Entry Process
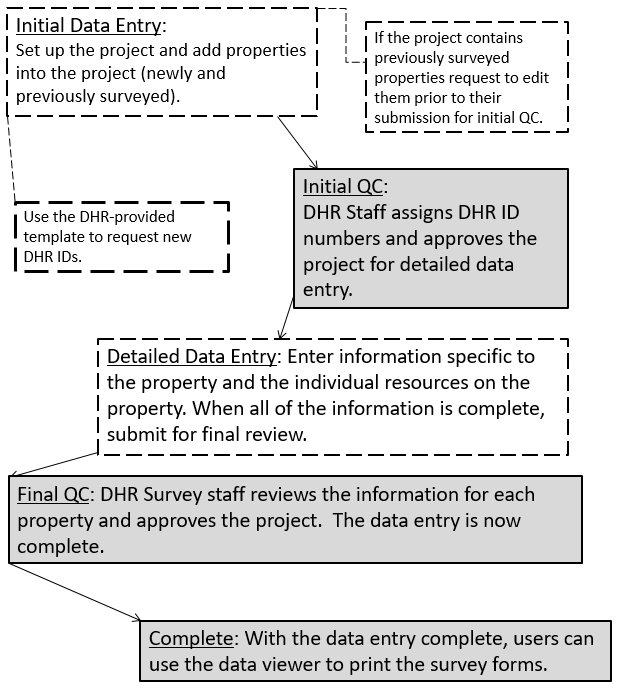
5.2.1 Initial Data Entry and QC

During the initial data entry users set up the project and associate the properties that they will update in the project.
Users need to request and receive approval from DHR to edit properties prior to submitting the project for initial QC.
See pages 25-38 for detailed information about the initial QC process.

During the initial QC step DHR staff will issue DHR ID numbers for newly recorded properties.
DHR requires that users utilize the DHR ID Request Template for newly recorded properties. Download the template here.
Once DHR approves Initial QC, the project is available for Detailed Data Entry
5.2.2 Detailed Data Entry and Final QC

During detailed data entry, users add information about the property on the Property Information Tab.
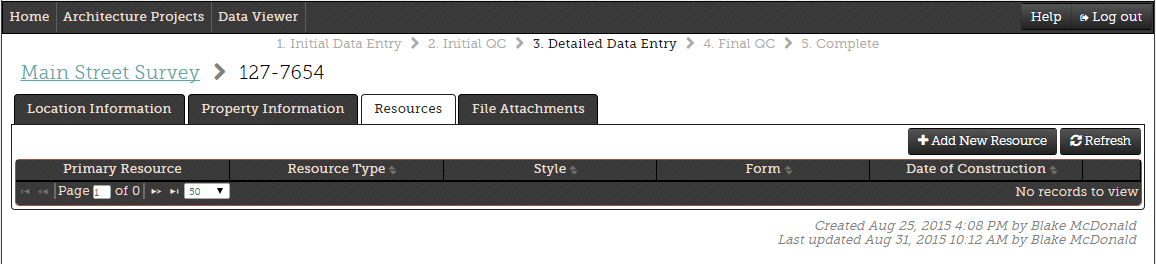
Information about the individual resources that are on the property are entered on the Resources tab.
Once the data entry is complete, users will submit the project for Final QC. Users cannot make edits to the data after a project has been submitted for Final QC.

During the Final QC stage DHR staff reviews the information about each property and resource.
Once DHR staff review is finished, the data is approved and the project is marked complete.

As soon as the data entry is reviewed and marked complete, the information is instantly available in the data viewer.
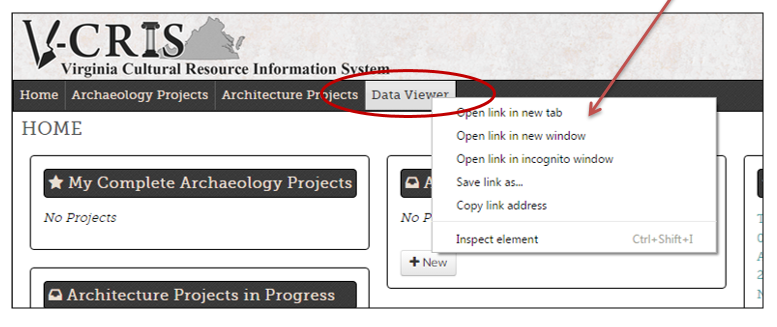
Use the data viewer to print copies of the survey forms and maps. Left click on the tab to navigate directly to the data viewer. Right click on the tab to open in a new tab or window.
5.3 Data Entry Detailed Guide
5.3.1 Initial Data Entry
5.3.1.1 Starting a Project
When logged into VCRIS, you will see two boxes on the home screen. The box on the left is for the completed projects. The box on the right holds all projects that are in process.
All data entry begins with the creation of a new project. From the VCRIS home screen, click New in the Architecture Projects tab.
Note: A project is defined only as a set of surveyed properties. In many cases, you may want to divide your data entry into several separate projects in VCRIS, either as an organizational tool, or because your survey includes properties in a historic district. You will need to create a separate project for properties in a historic district. Do not add historic district properties to VCRIS projects that include newly or previously surveyed individual properties.
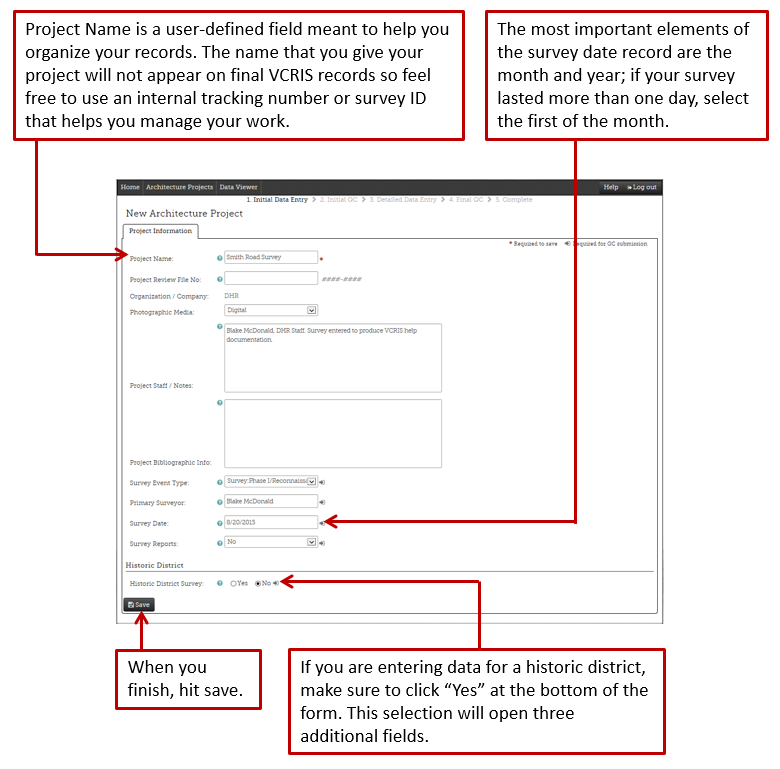
5.3.1.2 Project Information
The information entered into the Project Information page will populate individual property survey forms for the project. The information entered into the Project Information Page will appear as CRM Events on printed form and electronic information.
5.3.1.3 Adding Previously Surveyed Properties to a Project
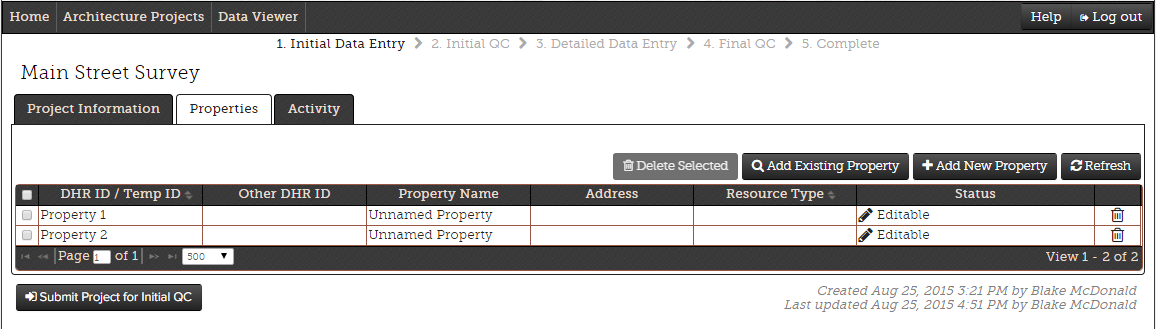
Once the project information is saved, two tabs labeled Properties and Activity will appear at upper left of the project window. Use the Properties tab to add the properties associated with the data entry project. To add new information to existing survey records, users must request permission to edit the property. DHR recommends requesting permission to edit properties prior to adding new properties to the project. This provides DHR staff with time to approve the request for you.
To add a previously surveyed property to a project, click on the Add Existing Property button at the top right.
Note: A project can include previously surveyed and newly surveyed properties provided none of them are in a historic district.
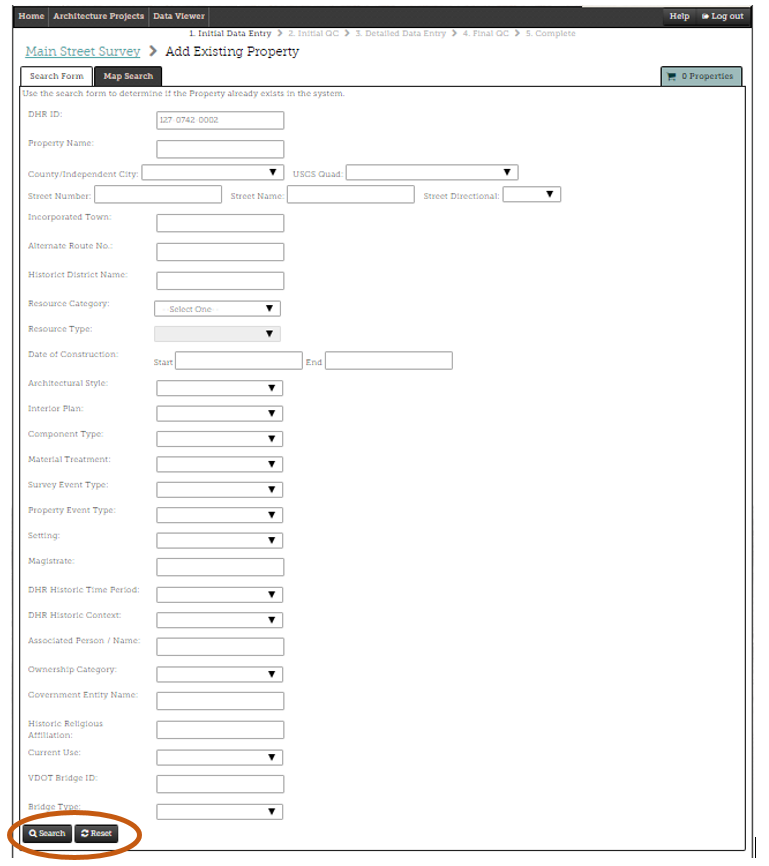
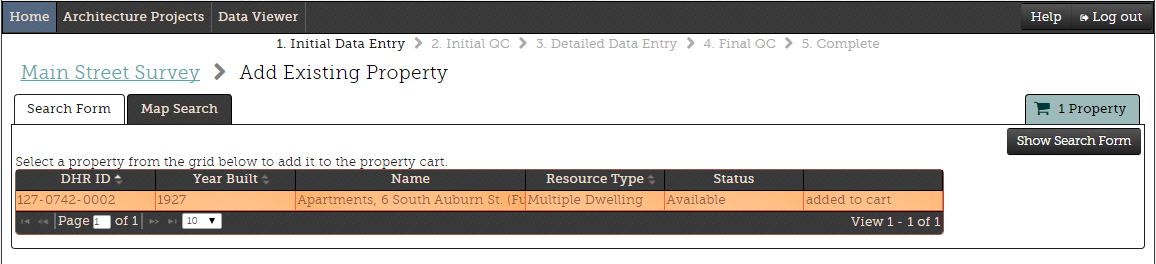
This search form allows users to quickly find previously surveyed properties and add them to a project. The easiest way to find a previously surveyed property is to search with the DHR ID number. If the DHR ID number is not known, you may search by property name, address, or any of the other fields listed on this page. Enter information and click Search at the bottom of the page.
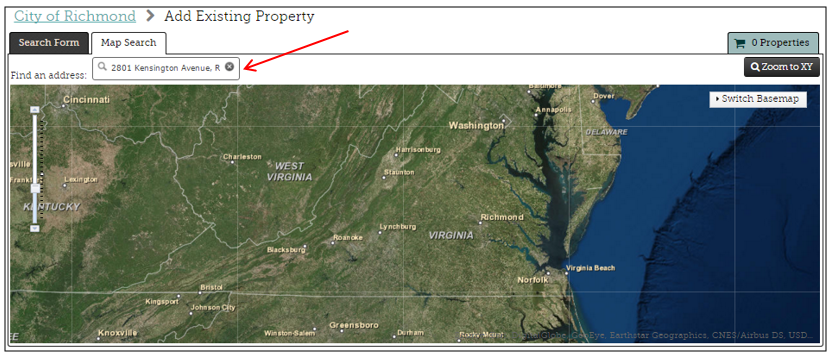
VCRIS also allows users to search and request properties using a map interface. From the Add Existing Property page, click on the Map Search tab and enter the address or use the map navigation tools to locate the resource.
Note: If using the address locator enter the complete address including the city and state.
Once the property is located, click on it and select Add to Cart from the pop-up box. If there are overlapping properties in the same location, such as individual resources and historic districts, they will be indicated in the pop-up box at the upper left hand corner of the page. Use the arrows to select more than one property.
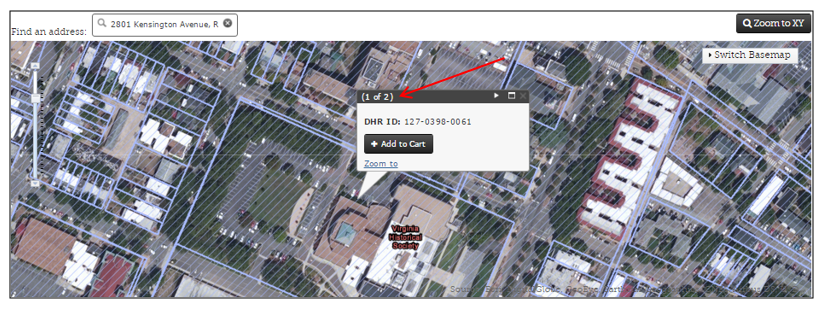
If the search returns a previously recorded property that you wish to add to your project, select it, and then click on the Add to Cart button. If you need to add additional properties, click on the Show Search Form button on the upper right to start a new search.
Once you’ve located the necessary records, you must submit a request to edit the record. Click on the shopping cart button , and then Request Properties


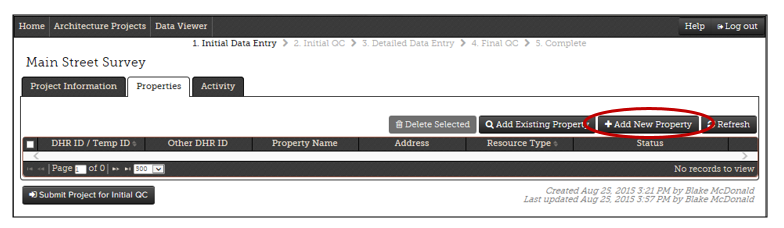
To add a newly identified property to the Project, click on the Properties tab, and then click on Add New Properties to enter the property name and location information for the property.
The Temporary Designation field, like the Project Name field on the previous page, is meant to help you organize your records and will not appear on your final record. It also will not be usable after the Initial QC is approved.
Once you’ve named the property, click on Map It to map the location of the property. The rest of the geographic data on this page will auto-generate once your property is mapped.
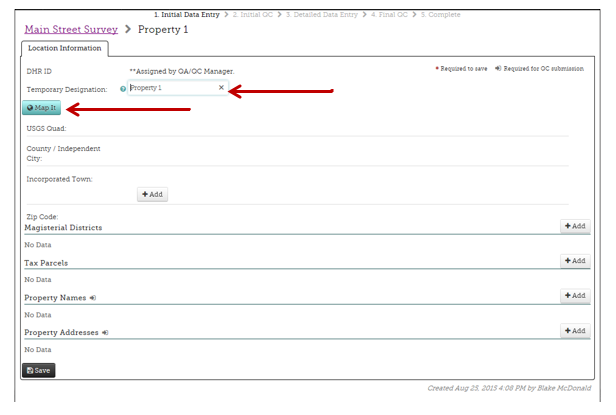
There are two ways to map your property: hand-drawing and uploading a shapefile.
5.3.1.4 Mapping a Newly Surveyed Property: Hand Drawing
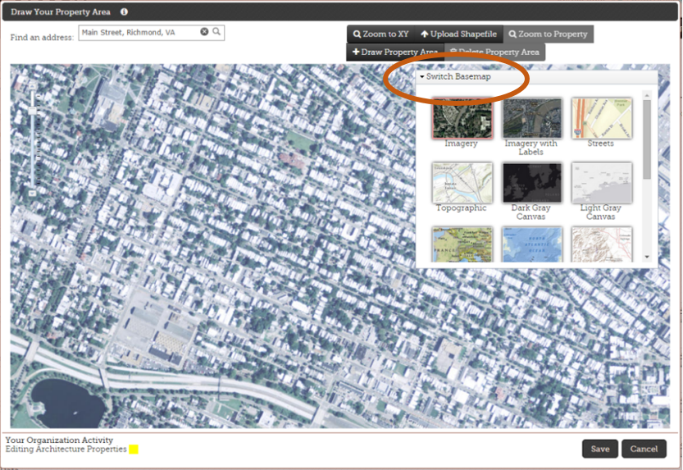
The Map It button will open a pop-up window with a satellite image of Virginia. Type the address into the field in the upper left corner. The aerial will zoom to general location of the property.
Choose your preferred basemap from the drop-down menu on the upper right.
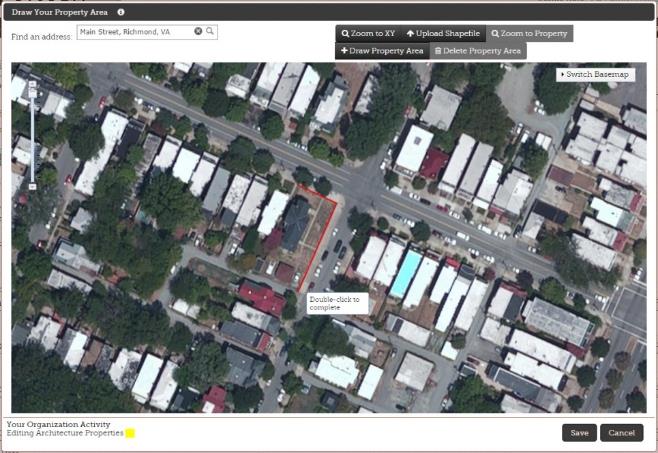
To hand draw the property boundary click the Draw Property Area button and begin tracing the boundary of your property by left-clicking once on the map. Left-click once at the property corner to complete a line. Press the Escape key on your keyboard if you need to start your property area outline over.
To complete a property area, double click. The outline tool will draw the shortest possible line from the last place that you clicked to the point where you started your area.
When you’ve completed your area outline, it will be shaded blue. If you need to alter your shape, click the Edit Property Area button in the upper right. A node will appear at the midpoint of each outline face. Click and pull on these dots to change the area outline. If you need to make significant changes to your outline, click the Delete Property Area button in the upper right to restart the outline.
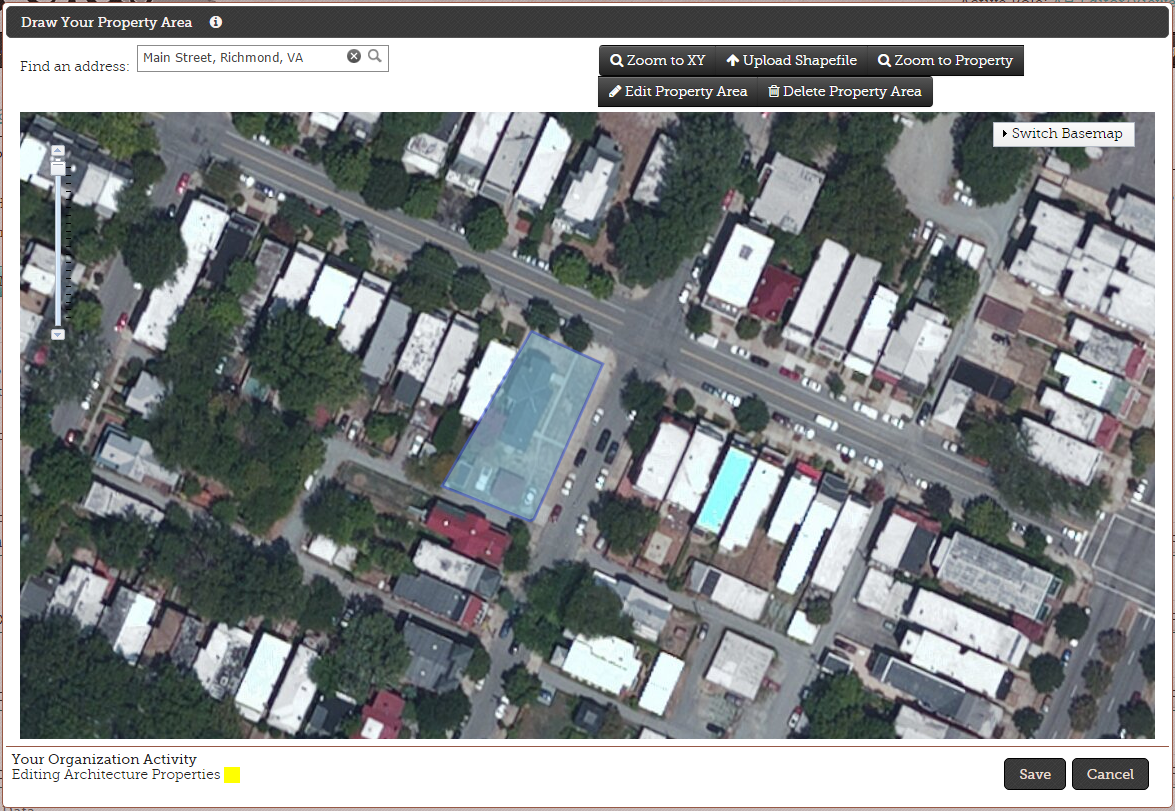
When you have finished your outline, click save. You’ll see that the additional fields in the Location Information section of your survey form.
5.3.1.5 Mapping a Newly Surveyed Property: Shapefile Upload
To upload a shapefile click on the Upload Shapefile button in the upper right. A pop-up box will appear, use the Choose File button to navigate to the GIS shapefile. Once you have chosen the GIS shapefile click on Upload to load the shapefile. The map will zoom to the location of the shapefile. If you need to edit the shape, follow the instructions outlined on the previous page.

5.3.1.6 Name and Address for Newly Surveyed Properties
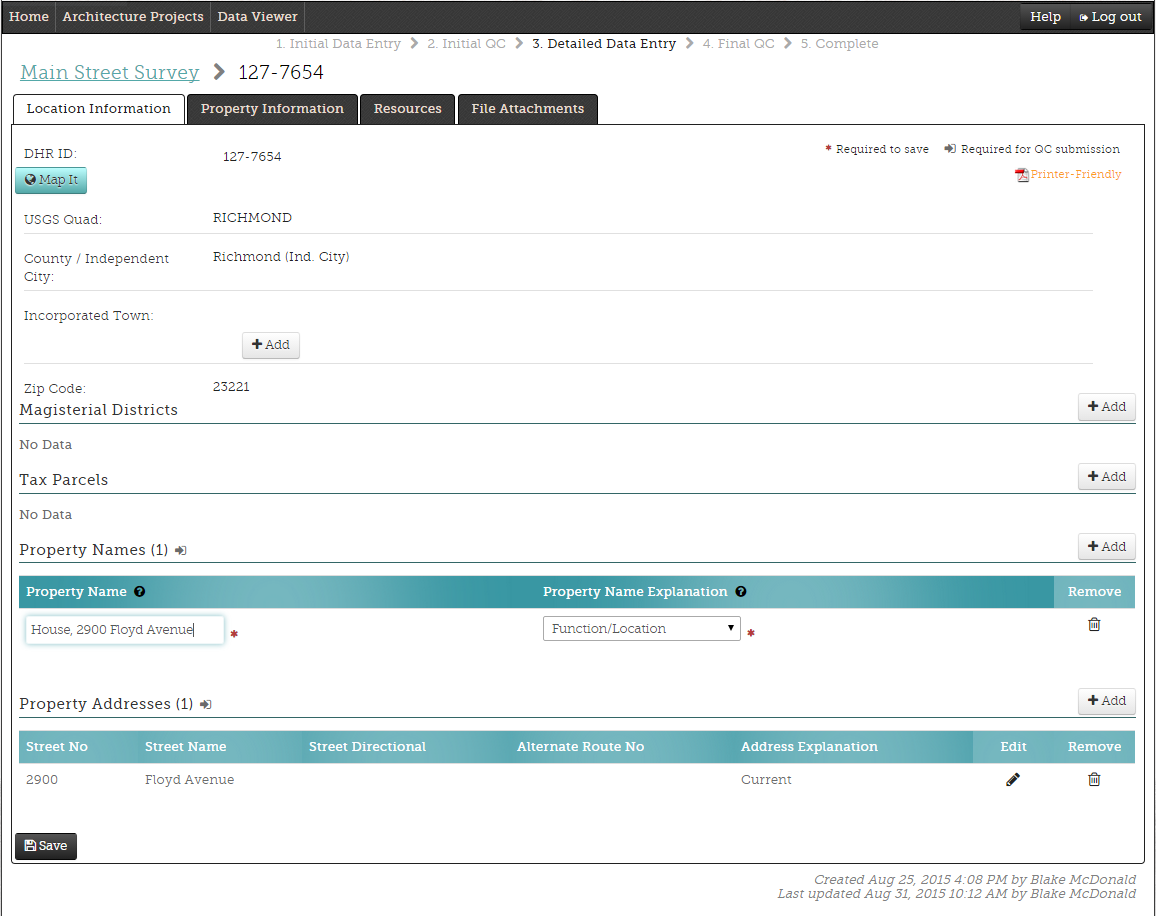
After mapping the property boundaries, the system will automatically return to the Location Information tab. To complete this page, you need to enter the Property Name and Property Address. For the Property Name, the preferred format is Function/Location. Enter the building type (house, store, etc.,) followed by the street address. See below for an example.
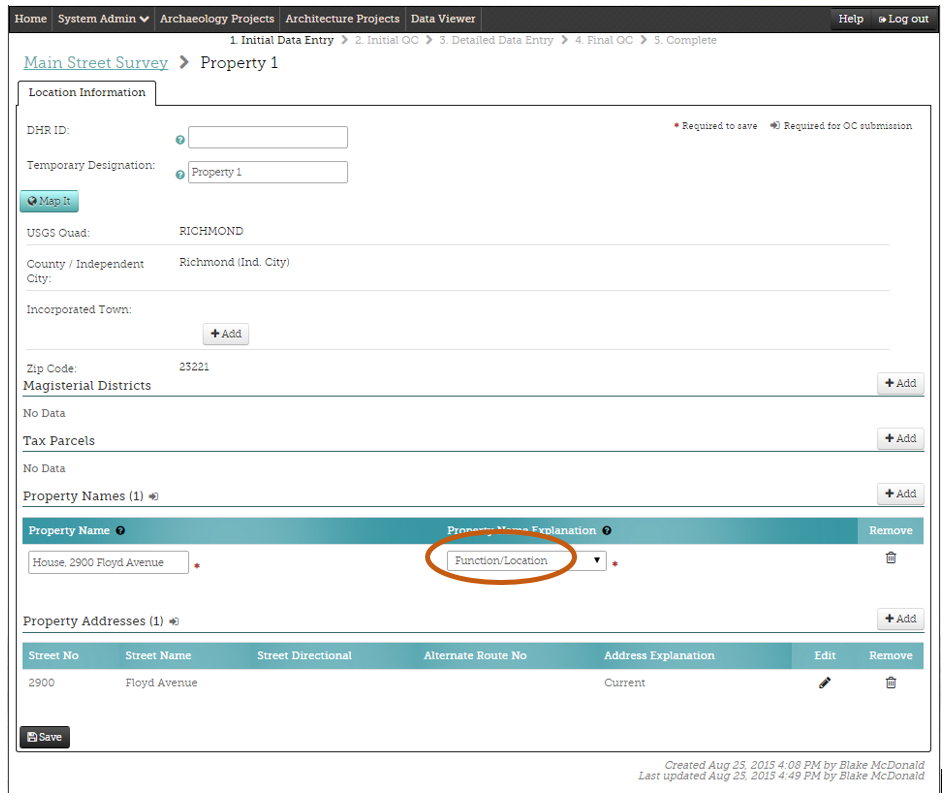
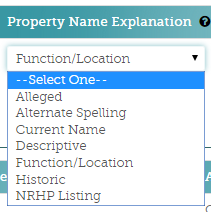 There are several other options for the
Property Name section. If you know the historic or secondary name for a
property, you can add them here by clicking on the Add button.
There are several other options for the
Property Name section. If you know the historic or secondary name for a
property, you can add them here by clicking on the Add button.
5.3.1.7 Adding Additional New Properties to a Project
If you want to add another new property to the project, click on the project name hyperlink and then on the Add New Property button. The system will return to the Properties page and allow you to add additional properties to the project.
When all of the properties are added to the project, click on the Save button before submitting the project for Initial QC.
5.3.1.8 Submitting a Project for Initial QC
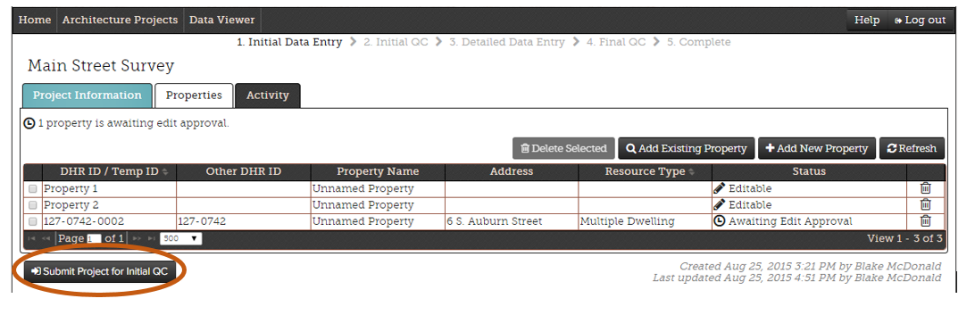
Once the location data for each new property is entered and the edit approval for each previously surveyed property is complete, the project can be submitted for Initial QC. Click Submit Project for Initial QC to begin this process.
During the Initial QC process the newly identified properties will be assigned DHR ID numbers. Any previously surveyed properties included in your project will not be given a new DHR ID number, but will become editable.
Note: You cannot submit the project for Initial QC without the approval to edit previously surveyed properties.
When a project is submitted for initial QC, the system will check that all the required information is entered and ask you to confirm you are ready to submit it. After submitting your project for initial QC, you will receive an email confirmation.
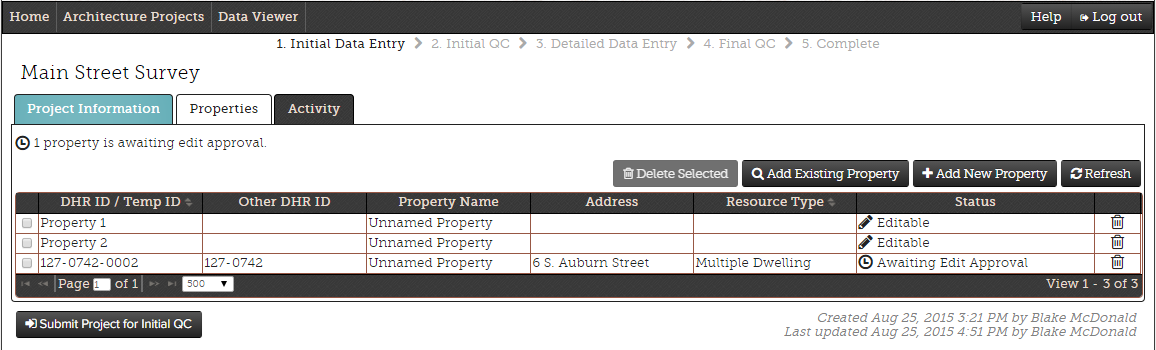
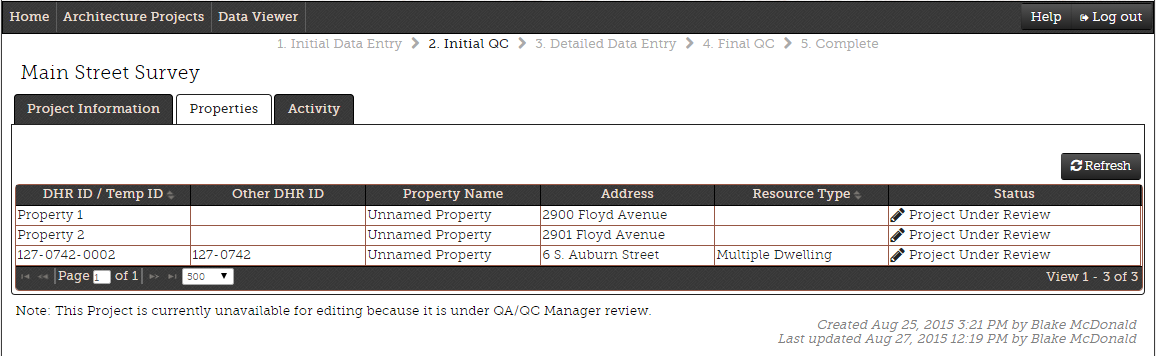
Once a project is under Initial QC review, users can not make any edits until the Initial QC is approved. This is what a project will look like while it is under Initial QC review:
During the initial QC review, DHR staff reviews the property mapping and information and issues DHR ID numbers for the newly recorded properties. If submitting a project of more than ten new survey records, please send the Architectural Survey Manager a DHR ID request spreadsheet.
You will receive an email with the subject line “VCRIS - Project ’Your Project Name' Initial QC was Approved.” when the initial QC is approved.
5.3.2 Detailed Data Entry
Once the Initial QC is approved users can begin detailed data entry. To do this, reopen the project in VCRIS, and click on a property to begin detailed data entry. When logged into VCRIS after the Initial QC is approved, the status of each property is editable and you will notice that a DHR ID number has replaced the temporary designation.

5.3.2.1 Location Information Page
When a property is in Detailed Data Entry, the Location Information page will appear first. This page is already complete, and unless edits are needed, proceed to the Property Information tab.
As you move through Detailed Data Entry, remember to always press save at the bottom of the page.
5.3.2.2 Property Information Page
The Property Information page includes several fields and text boxes. Pictured below is the upper section of that page with descriptions for each item.
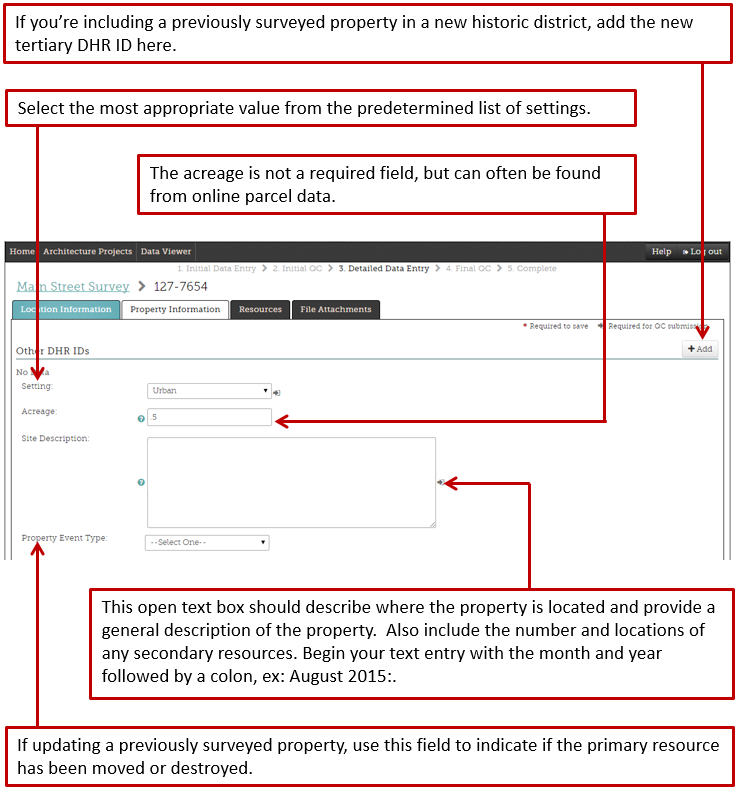
The middle section of the Property Information page is pictured below with descriptions for each item.
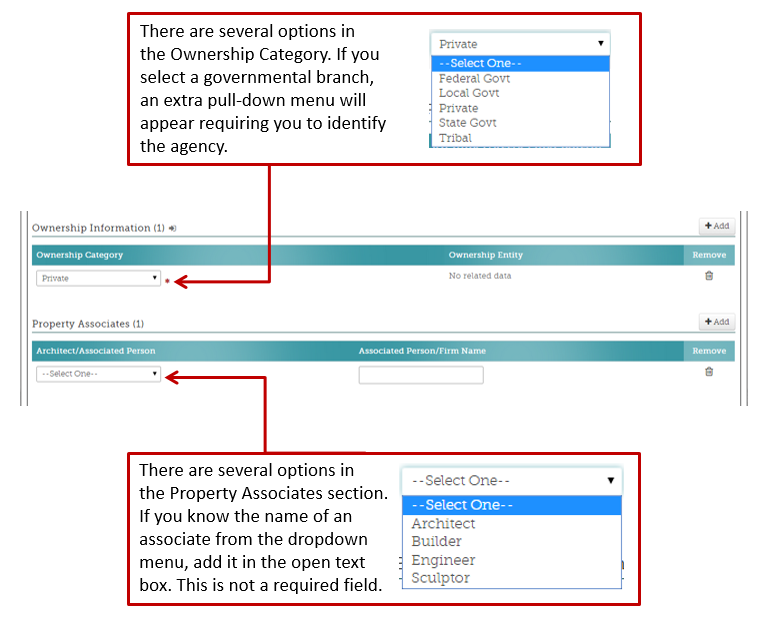
The lower section of the Property Information page is pictured below with descriptions for each item.
5.3.2.3 Adding New Resources
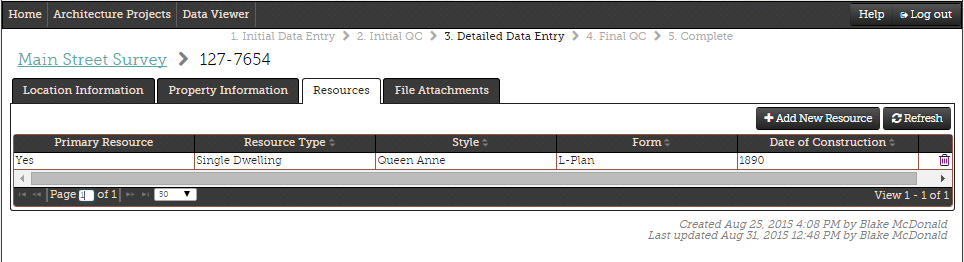
When the detailed Property Information page is complete, click on the Resources tab, and then on Add New Resource to begin adding information about the individual resources on the property.
The Add New Resource tab opens the Individual Resource Information page. The Appendix includes a list of the resource category and types and the building component information.
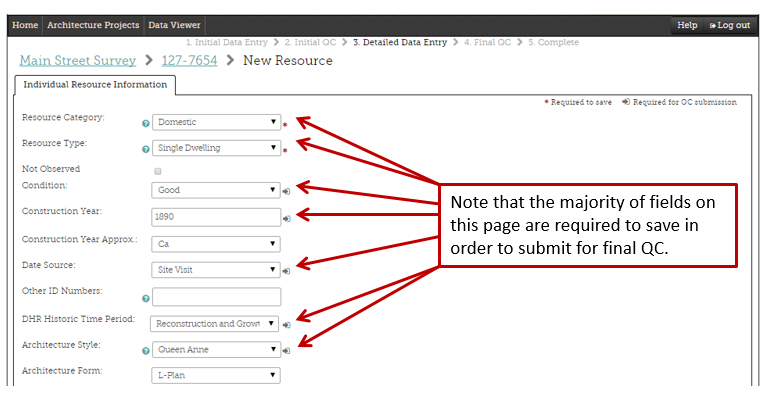
Note: Use the “Tab” key to easily navigate between drop-down data boxes.
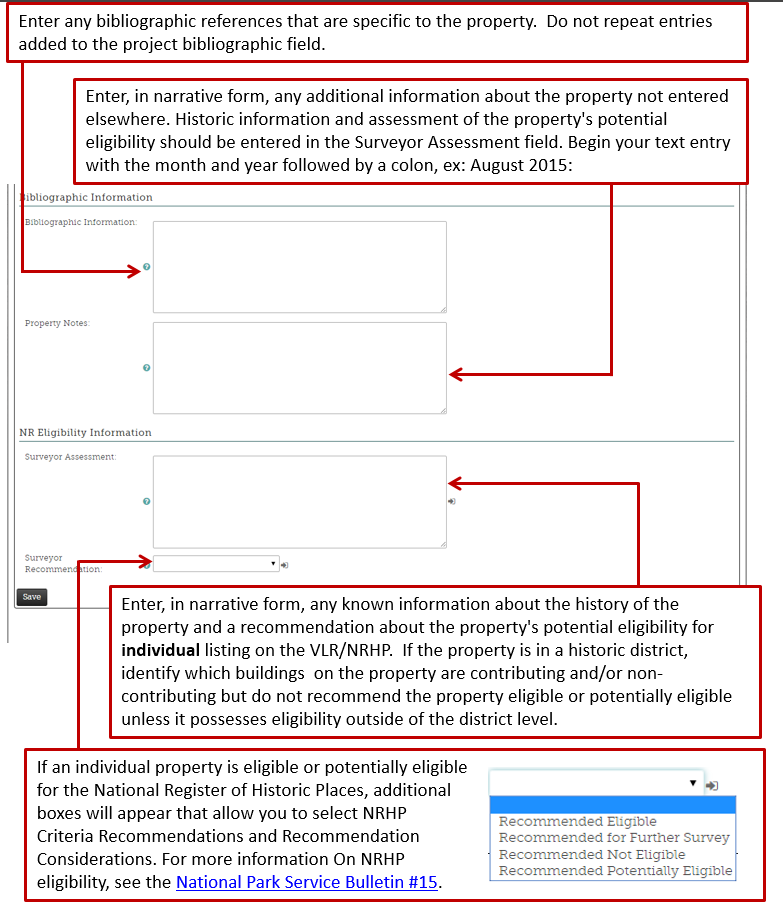
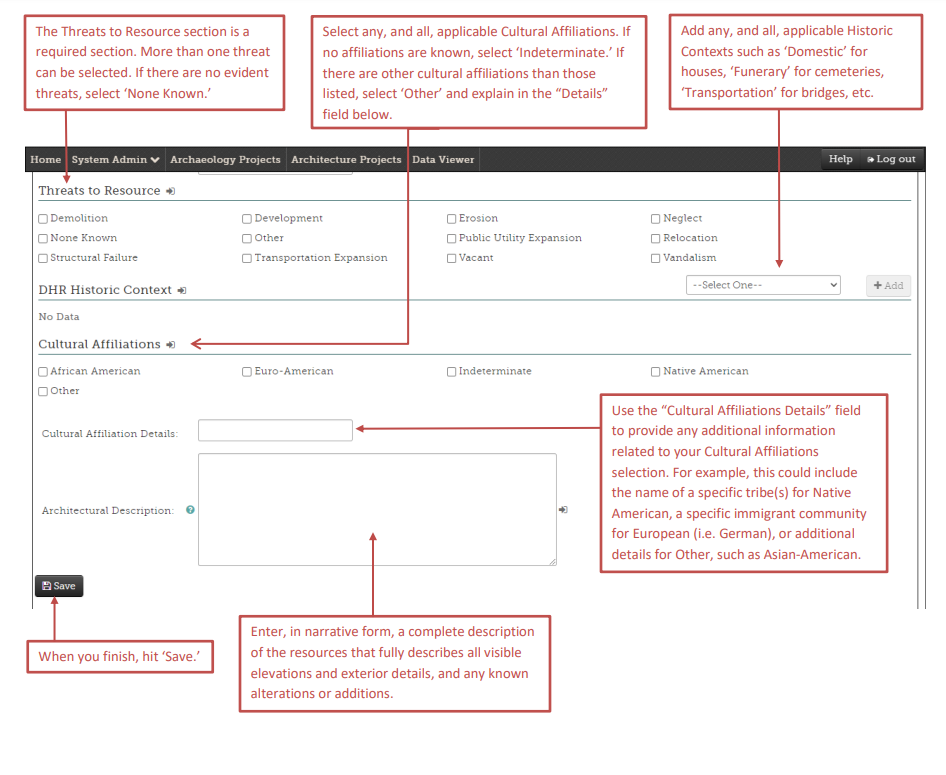
Next, enter threats to the resource, all historic contexts, and a detailed architectural description in the open text box at the bottom of the page.
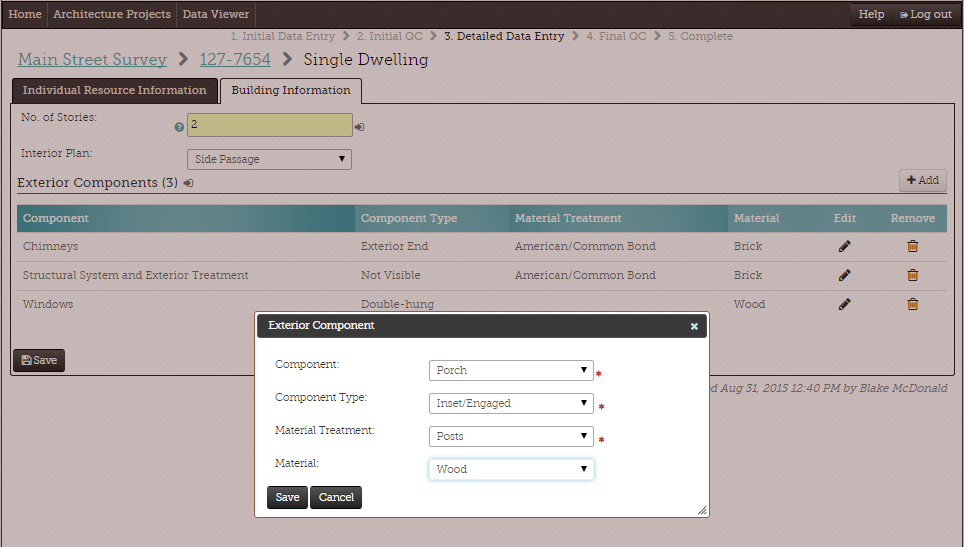
5.3.2.4 Building Information Tab
If the individual resource is a building, an additional tab will open. To add building specific information, click on the Building Information tab. After adding the number of stories (whole numbers and decimals only, no fractions) and interior plan, click Add to add data on specific components of the building.
Note: The component information is only required for the primary resource.
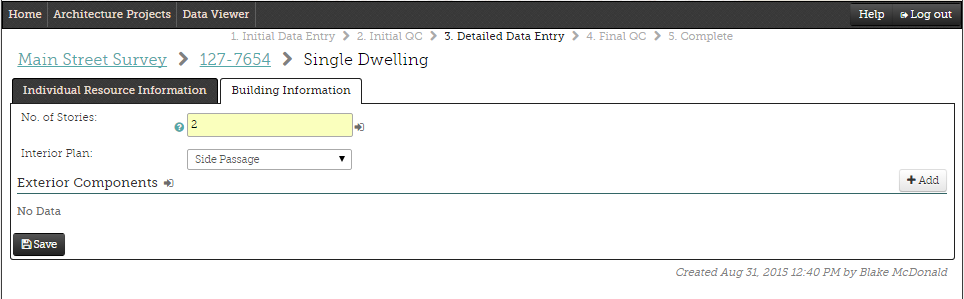
Add as many of the individual building components as your survey observations permit. The Appendix includes a listing of all of the options in each of the drop-down menus. Make sure to hit Save when you’re done adding components.
5.3.2.5 Adding Additional Resources
If a property contains more than one resource, add additional entries from the Resources tab. The process and pages associated with adding an additional resource to a property are identical to those used for the primary resource and described in the previous slides.
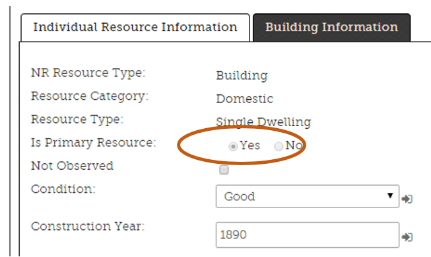
The addition of secondary resources opens an extra field, labeled “Is Primary Resource,” on the Individual Resource Information page of each resource. When you add a secondary resource, this field will auto-populate to show that the first resource entered into the property is the primary resource. If the primary resource was not the first one entered, simply open the Individual Resource Information page of the newly identified primary resource and change this field. The other resources will auto-populate as secondary.
5.3.2.6 Bridge Information Tab
If a property contains a bridge, select “Transportation” in the “Resource Category” drop-down menu, and then choose “Bridge” in the “Resource Type” list.
The Bridge Information tab consists of open text boxes and drop-down menus. The Bridge Structure Number and Bridge ID are designated by the Virginia Department of Transportation and are not required for completion of the survey form.
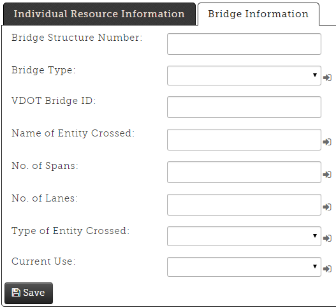
When you finish, hit Save.
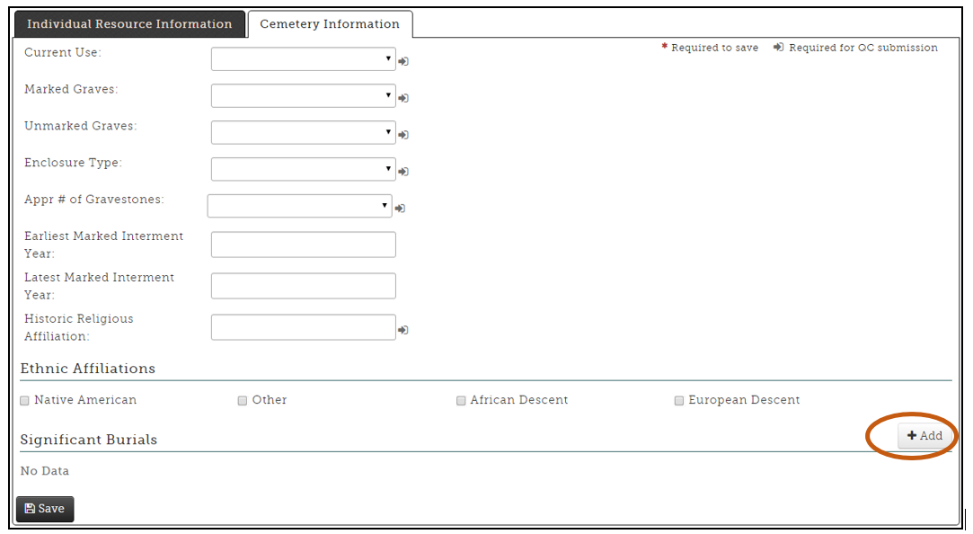
5.3.2.7 Cemetery Information Tab
If a property contains a cemetery, select “Funerary” in the “Resource Category” drop-down menu, and then choose “Cemetery” in the “Resource Type” list. The Cemetery Information tab will open. This tab contains open text boxes and drop-down menus specific to cemeteries.
Select Add to open a pop-up window where you can enter information on a significant burial, including marker type, name of interred, and birth/death year on marker. This section is not required.
5.3.2.8 Updating Previously Recorded Properties
When adding new information to previously recorded properties do not delete or modify any of the existing information in the record.
Instead add narrative updates to all of the open text boxes below the existing text.
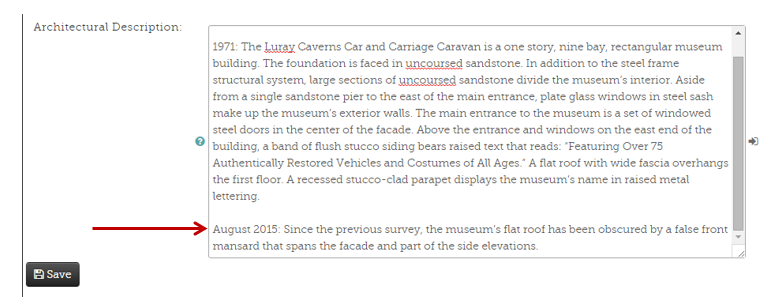
Remember to preface your narrative updates with the month and year that the property was observed, i.e. “September 2015:.”
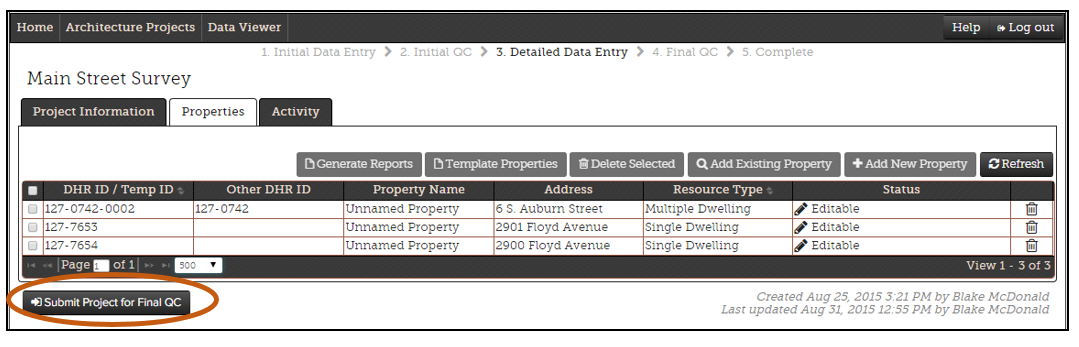
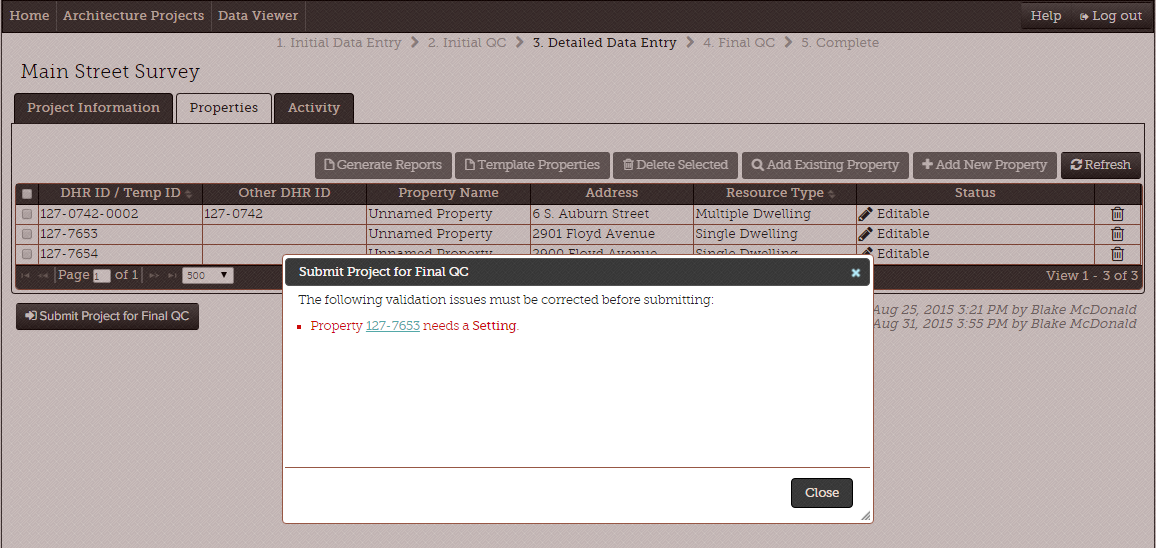
5.3.2.9 Submitting a Project for Final QC
Once all detailed data for each property is entered click Submit Project for Final QC to begin final review process. Make sure that all text, recommendations, and map locations are finalized before submitting the project for Final QC.
During the Final QC review, DHR staff will review the detailed information and approve the project. When Final QC is approved, the project is marked complete and the data is visible in the VCRIS data viewer.
Once the data is part of the VCRIS data viewer, users can no longer edit it. Any requests for edits to properties should be coordinated with DHR survey staff.
Similarly to Initial QC, a pop-up describing any incomplete fields will appear. Within each bullet point is a hyperlink connected to the page where a change or addition is necessary. Make these corrections, and then click Submit Project for Final QC again.
The VCRIS system will automatically generate an email when the project is reviewed and approved. At that point, the survey forms are accessible in the data viewer and the forms can be printed for submission.
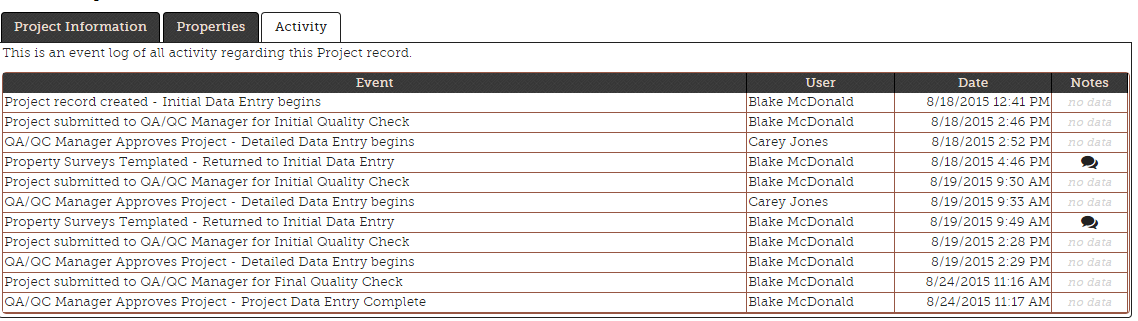
5.3.2.10 Additional Tabs
The activity tab provides a list of the data entry steps and dates completed. Click on the Notes icon to read any notes from DHR staff about the data entry project.
5.3.3 Submitting Survey Materials
5.3.3.1 Required Materials for Every Property
Printed VCRIS forms
Printed and digital images. For more information go to:
http://dhr.virginia.gov/pdf_files/DHR_Architectural_Survey_Photograph_Policy_2016.pdf
Printed Site Plans
Organize materials by primary DHR ID except for properties in a historic district
Send all survey materials to:
Survey Coordinator, Department of Historic Resources
2801 Kensington Avenue,
Richmond VA 23221
5.3.3.2 Printing Survey Forms – Individual Forms
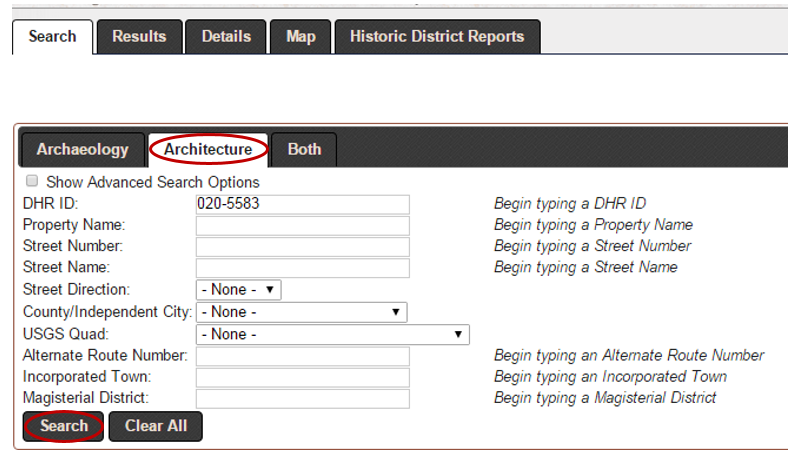
In the data viewer select the Architecture tab and enter the DHR ID number in the data field. Click the Search button.
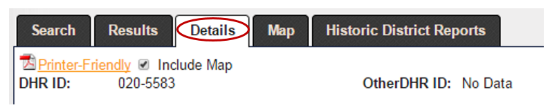
This will activate the Details button and create a PDF. In order to generate the PDF for saving and printing click on the *Printer Friendly button. To generate a map with the form, click on the box.
5.3.3.3 Printing Survey Forms – Multiple Forms: Historic Districts
In the data viewer select the Architecture Tab and enter the DHR ID number for the historic district. Click the Search button. This will activate the Results tab. Select all of the records by clicking on the small box in the title line of the results grid. Then click on the Print Multiple Reports button. This will generate one PDF of all the records in the district.
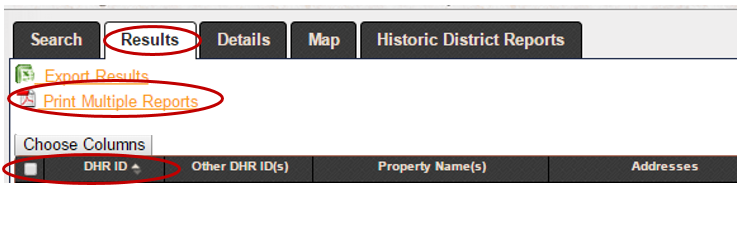
Note: A warning will pop-up if more than 25 reports are selected. Click OK to proceed.

5.3.3.4 Printing Survey Forms – Multiple Forms: Specific Project
In the Data Viewer select the Architecture tab and the Advanced Search Options button. Enter information unique to the project (see examples below and on the next page). Follow the directions for printing multiple forms as outlined on the previous page.
Example I: Survey performed by a specific organization in one locality: enter the organization name and select locality.
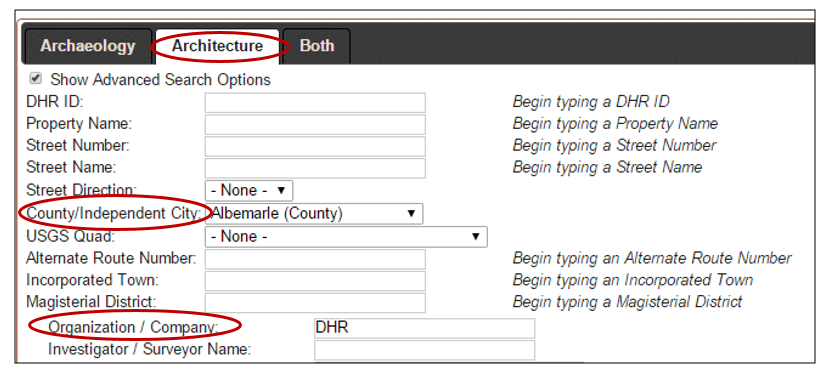
In this example, all survey performed by DHR after 1/1/2015 will be returned. Others options include before (less than), on a specific date (equals) and during a specific time (between).
5.3.3.5 Site Plans
A property site plan is required for all properties in a survey area. The site plans should show the location of all recorded resources and other significant features on the property. The site plan should illustrate the relationship of the resources to the street or road that provides access to the property. The site plans should provide details about buildings, such as roof form, porches, and building type.
Site plans should be labeled with the resource name, DHR identification number, the date of survey, and a north arrow. Indicate whether or not the site plans are drawn to scale. Either hand-drawn or digitally produced site plans are acceptable.

This site plan is a good example of how to accurately represent several different resource types and landscape features.
5.3.3.6 Photographs
A photograph of each resource is required. DHR photographic guidelines require a printed black and white or color photograph and a corresponding digital image. The printed photos can be 3.5x5 or 4x6 inches and can be printed commercially. Submit photos in transparent photo protector sleeves.
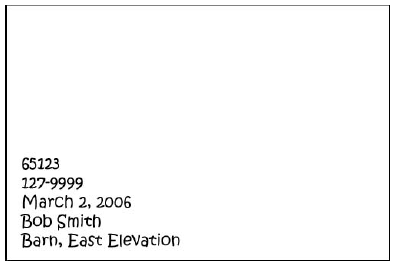
Label the back of each photo with a soft lead pencil and include the DHR ID number, date of survey, photographer/agency/ consultant name, and the resource name and photo direction.
5.3.3.7 Photographs
Color digital images are also required for all architectural surveys. The digital images should be submitted on a DVD or CD. The images must be:
Saved as .JPGs
1600 X 1200 pixels at 300 ppi
Less than 10 MBs per photo
The individual digital images should be labeled with the following information in this order:
DHR ID number
Resource Name
Year the photograph was taken
Description of the view.
Examples:

The images should be organized in folders named using only the DHR ID#. No other information should be included in the folder name.
If a property has more than one DHR ID number use the original number DHR ID#, not the Other DHR ID number.
A complete copy of the photographic documentation is available in the Appendix and on DHR’s website.
5.3.4 Advanced Functionality
5.3.4.1 VCRIS Template Functionality
In VCRIS, the template functionality provides users with a mechanism to make a copy (or template) information in a single record to create new records with the same information as in the original record.
The template functionality becomes available during Detailed Data Entry, and will copy all information entered into an individual property record up to this point into a new property record (Location Information, Property Information, Architecture Resource Fields, and Secondary Resource Entries).
The template functionality is helpful when creating records for several similar buildings. For example, recording a mid-20th century suburban residential development or a historic district with numerous similar resource types.
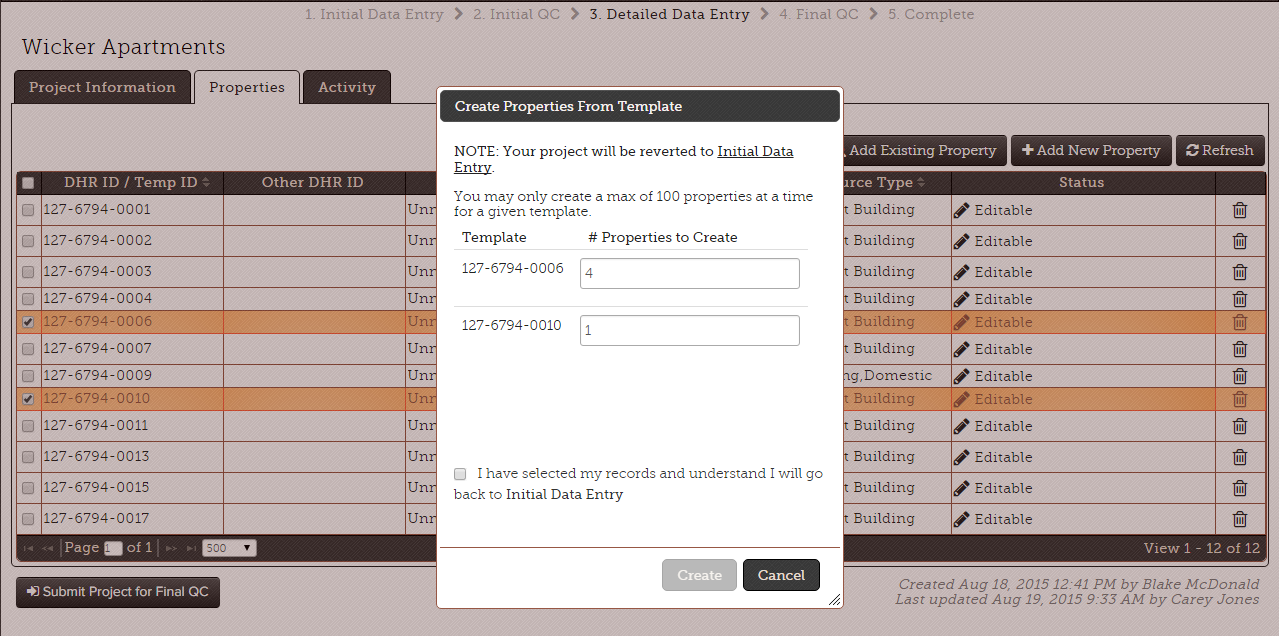
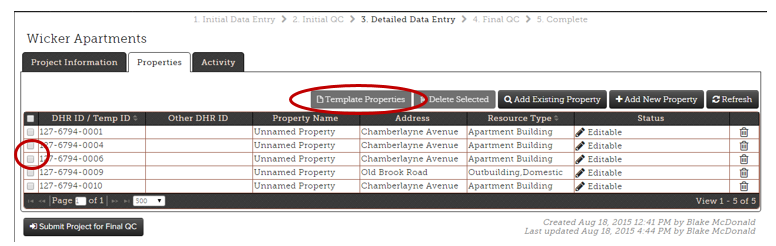
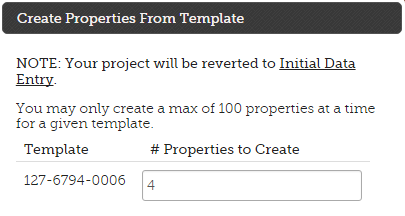
The following section will demonstrate how to template both individual and multiple records using the Wicker Apartments Historic District in Richmond, Virginia (DHR ID number 127-6794) as an example.
Once your project has been approved in Initial QC, the Template Properties button will appear above the properties table entries on the Properties tab. To begin the templating process, select a property by clicking on the box to the left of the DHR ID number and click in the Template Properties button to open the template pop-up window.
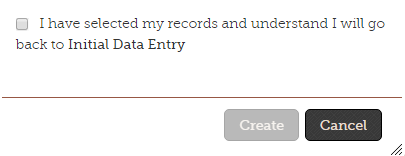
When templating properties, the project will be returned to Initial Data Entry in order to map each new record.
Enter the number of copies needed in the open text box.
The Create button will not activate until you check the box to confirm your action.
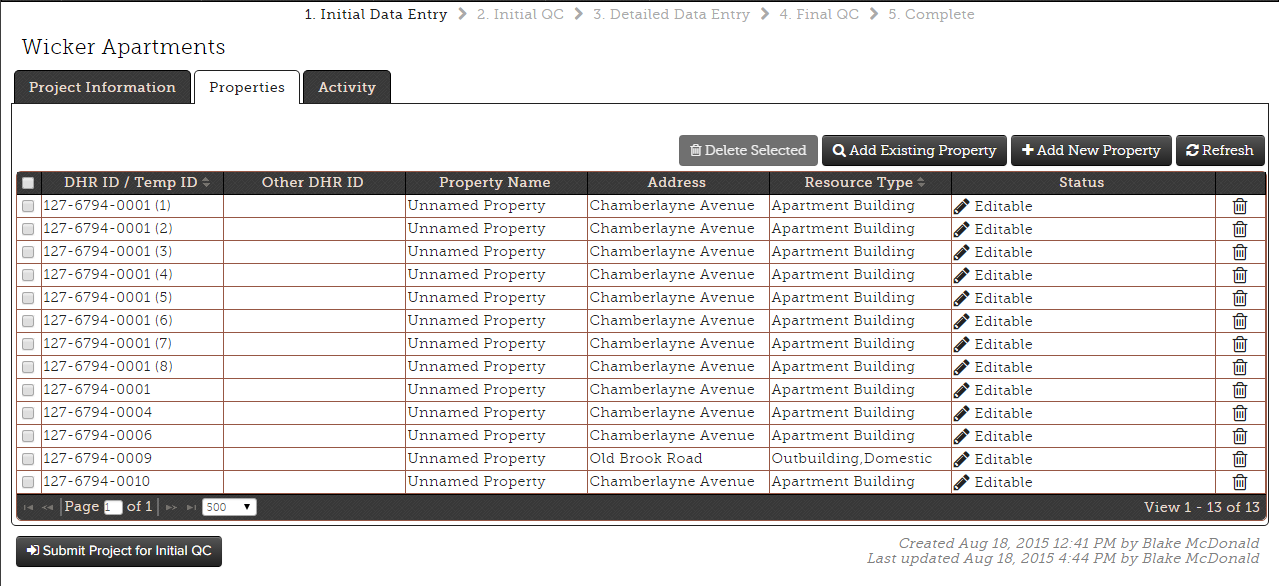
Once a copy is made of the original record, VCRIS returns to Initial Data Entry. As with any Initial Data Entry, users must map and add address information for each of the newly created records.
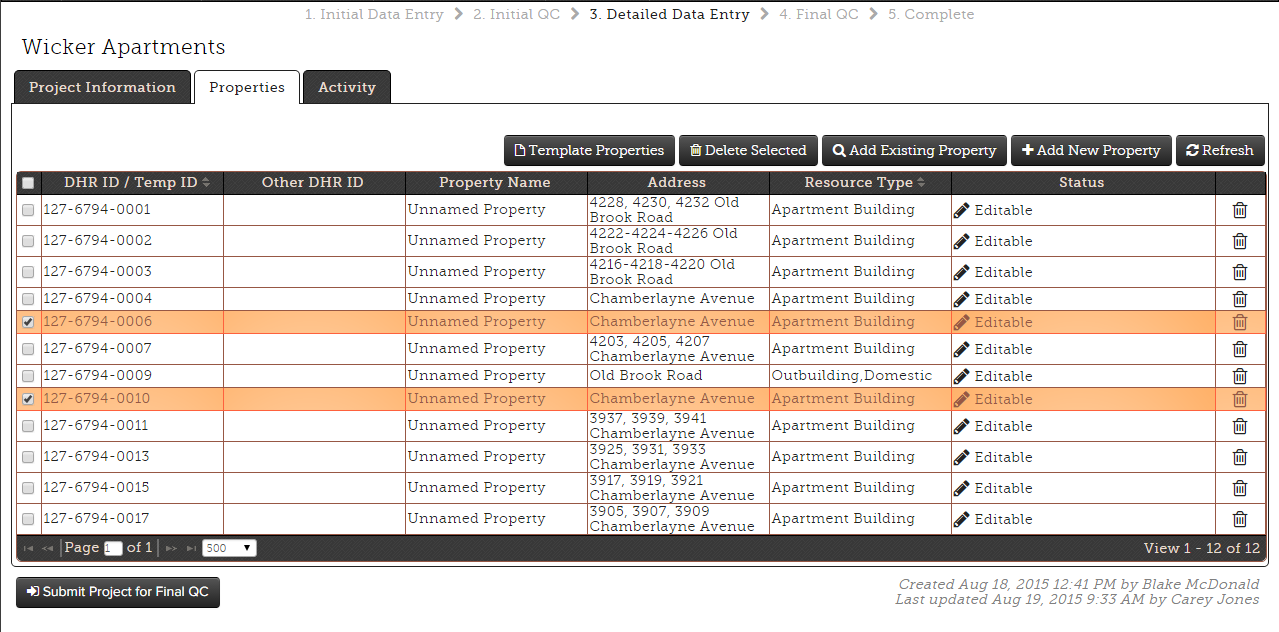
Once all properties are mapped and have property name and location information, resubmit the project for Initial QC by clicking in the Submit Project for Initial QC button. Once approved, all of the detailed data from the original record will be visible in the new records.
Users can also template more than one record at a time. The process for copying several records at once is the same as for a single record. Simply select more than one property from Detailed Data Entry before clicking on the Template Properties button, as shown below.
When copying several records at once, the template pop-up window will show separate open text boxes for each DHR ID number being copied. Enter the number of copies wanted for each record, check the box to confirm this action, and click the Create button.